Remove false-positive health check Failures in Azure API Management

A client of mine has the following configuration for many of their apps

  • Azure API Management (Consumption plan) in front of an
  • Azure Service Bus Topic and
  • An Azure Function to process messages from the topic, with
  • Azure Application Insights for monitoring everything and
  • A static metric alert rule against the Application Insights instance, for Exceptions > 0 which
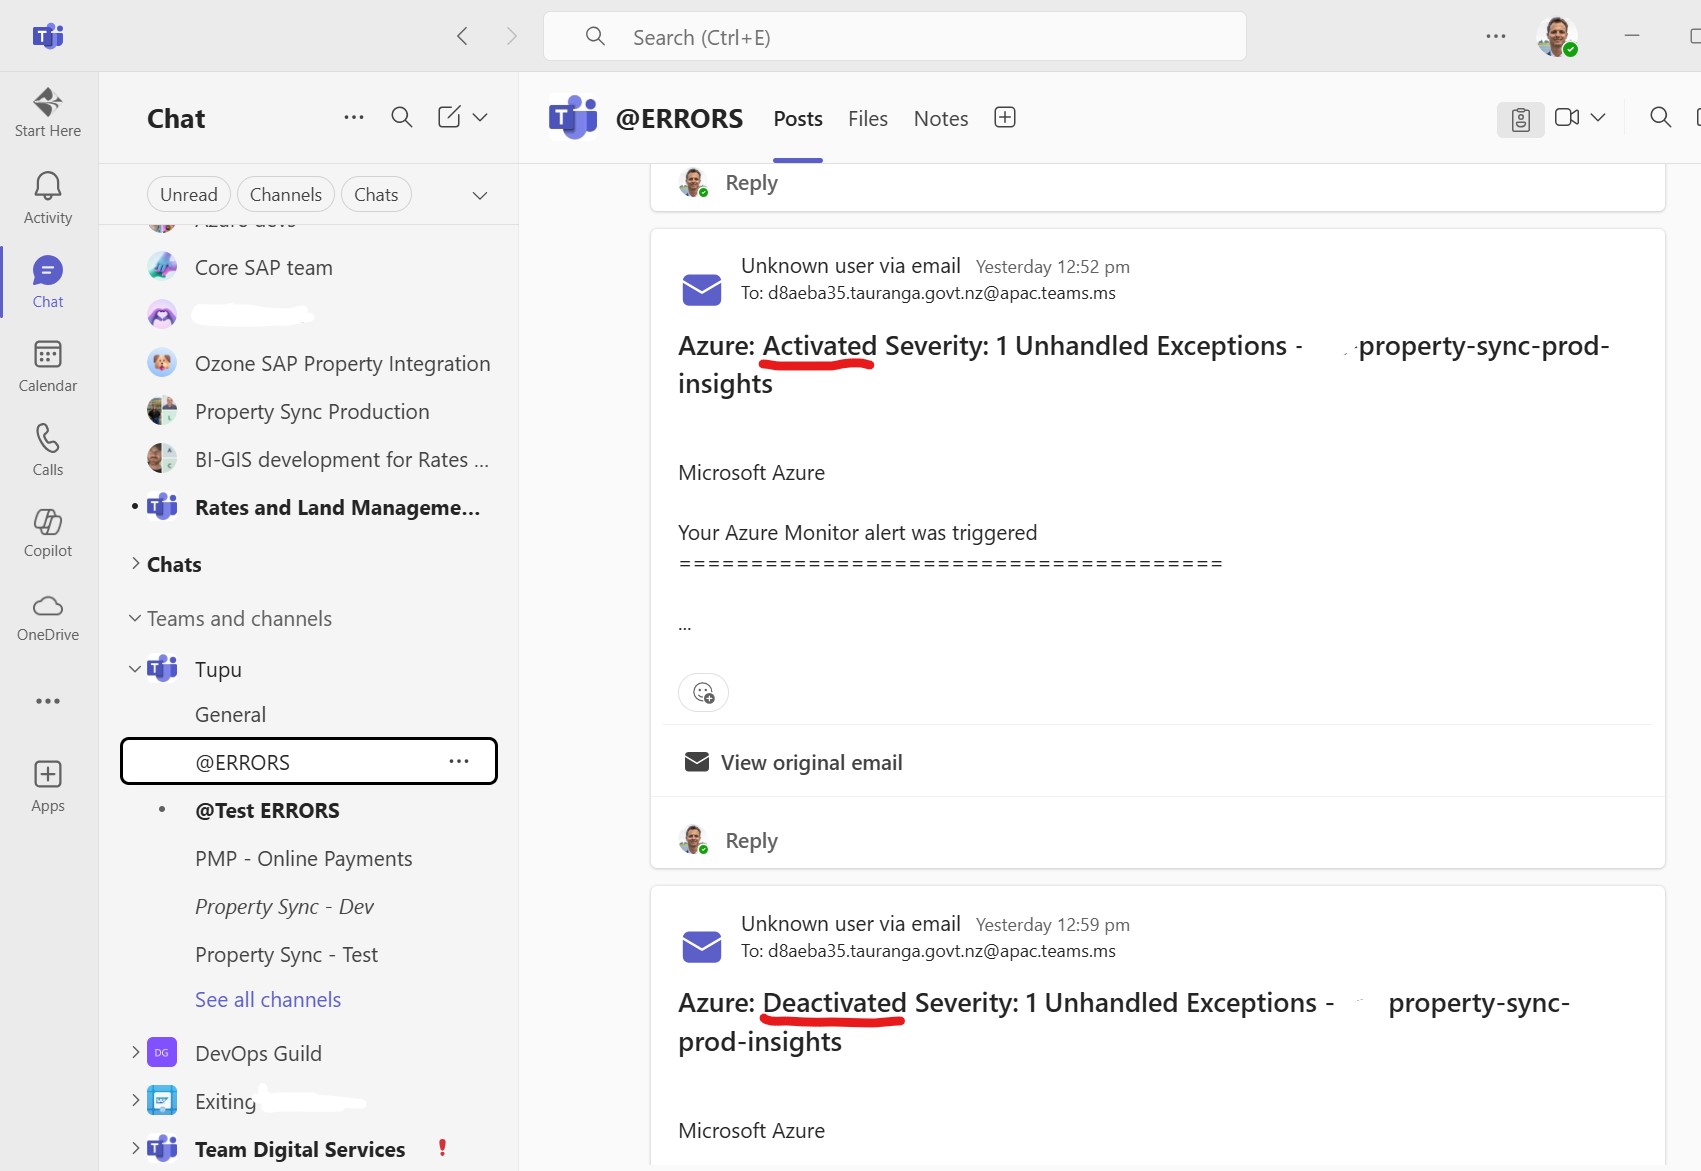
  • Sends an email to an MS Teams email address which
  • Posts an alert to MS Teams, whenever any exception occurs

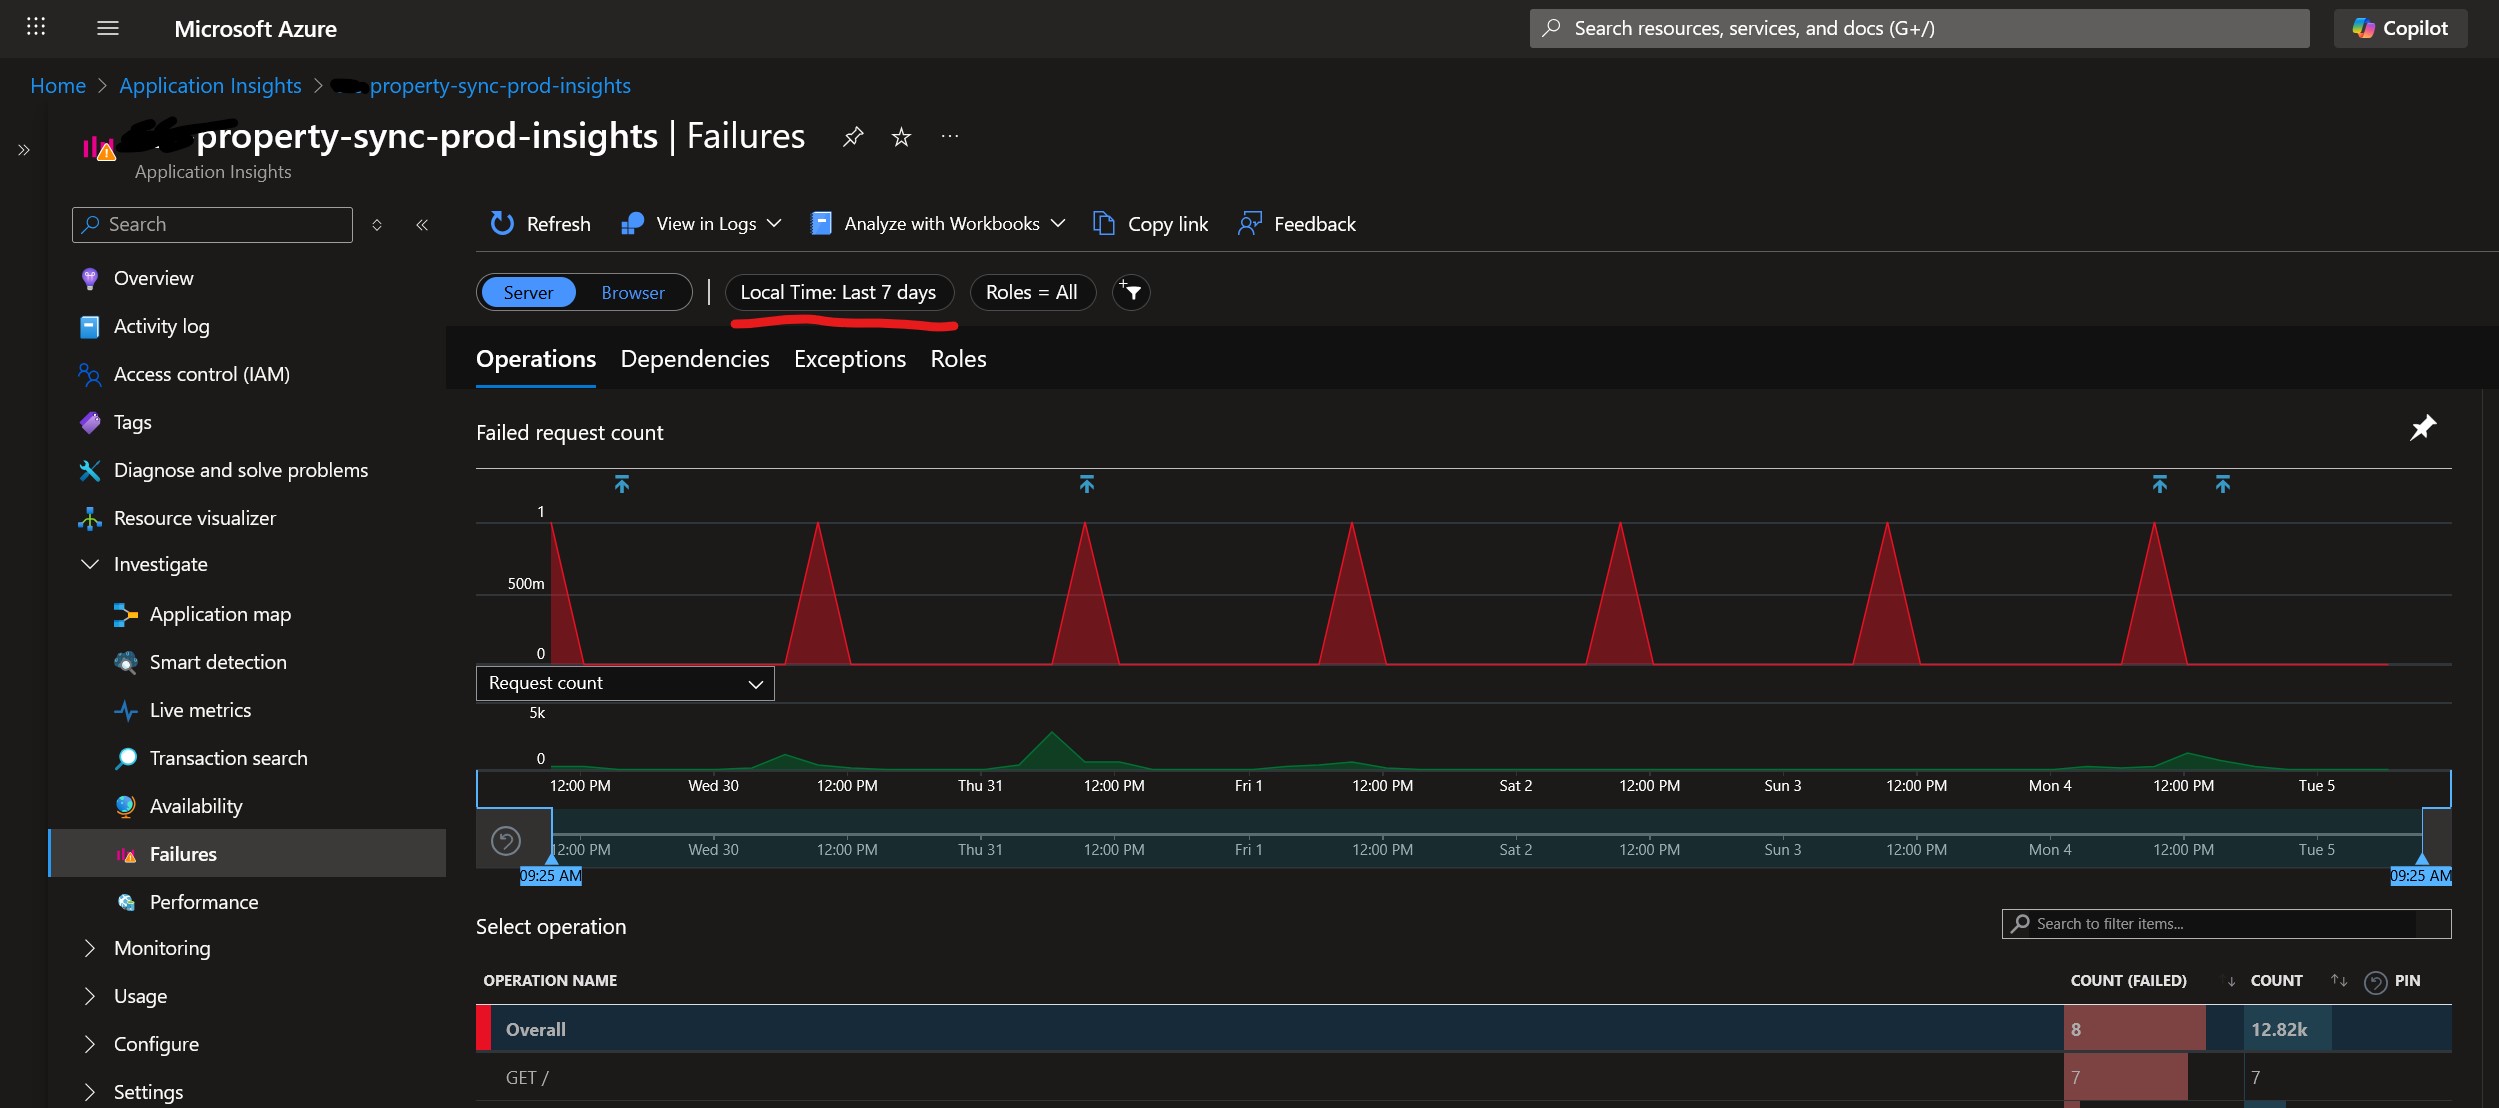
Every day at around the same time, something mysterious (which doesn’t belong to us) pings all of their Azure API Management instances at site root, i.e. GET /. We don’t know what it is, but I guess it’s something to do with Azure Monitoring or infrastructure, or a keep alive or something. Our APIM doesn’t have anything at site root /, so it returns a 404. This 404 is counted as an Exception which is logged as a regular Failure in Application Insights:

Application insights showing a failure at 9:20am every day for the last 7 days

Which means every day at the same time we get false positive alerts (activated + deactivated) in our Teams channel:

MS teams alerts

The workaround is quite simple – add a “health check” endpoint at APIM’s site root to return a 200 instead of a 404. We can use APIM’s mock-response for this:

Azure API Management API showing an endpoint

N.B. make sure the API’s URL scheme is both HTTP and HTTPS.

The inbound policy looks like this:

<policies>
  <inbound>
    <base />
    <rate-limit calls="1000" renewal-period="60" />
    <mock-response status-code="200" content-type="application/json" />
  </inbound>
  <backend>
    <base />
  </backend>
  <outbound>
    <base />
  </outbound>
  <on-error>
    <base />
  </on-error>
</policies>

And here’s a Bicep snippet to deploy it. Pro-tip: you can use ”’ to embed the XML:

resource healthPolicy 'Microsoft.ApiManagement/service/apis/operations/policies@2023-05-01-preview' = {
  parent: healthOperation
  name: 'policy'
  properties: {
    format: 'xml'
    value: '''
<policies>
  <inbound>
    <base />
    <rate-limit calls="1000" renewal-period="60" />
    <mock-response status-code="200" content-type="application/json" />
  </inbound>
  <backend>
    <base />
  </backend>
  <outbound>
    <base />
  </outbound>
  <on-error>
    <base />
  </on-error>
</policies>
'''
  }
}

Hopefully that helps someone.

Edit, a few days later:

Once we implemented the mock-response, that didn’t fix the problem of the alerts being fired. Whatever is calling us has a very short timeout, so our 404s became replaced with ClientConnectionFailure exceptions.

The workaround I settled on is to change our static metric alert on “Exceptions > 0” to a Custom Log search, and I explicitly exclude errors when calling the site root URL, with a custom query

exceptions
| where operation_Name != “GET /”
| project TimeGenerated = timestamp, problemId

azure portal alert rule

PSA: Bicep templates run in parallel

I had a problem recently where my Bicep templates were failing with an obscure error message:

The incoming request is not recognized as a namespace policy put request.

The Bicep in question was attempting to assign an Azure Service Bus topic subscription’s forwardTo to another queue.

I had ordered everything in the Bicep file correctly, i.e.

  1. Create the topic
  2. Create its subscriptions
  3. Create the queues
  4. Tell the topic subscription to forward messages to the queue

However, when I looked at the Deployments in the Azure Resource Group, it appeared that they weren’t running in the order I had specified:

This is because by default Bicep templates will run in parallel, unless it detects dependencies. And because my templates were a bit too clever with variables and modules, Bicep was unable to detect my implicit dependencies.

The fix then was to be explicit with my dependencies, using the dependsOn keyword:

// create service bus topics And subscriptions
param topicsAndSubscriptions array = [
  {
	topicName: 'property~changed~v1'  // ~ is what Azure uses for a forward slash, so this topic is actually property/changed/v1
	sanitizedName: 'property-changed' // Azure doesn't like ~ or / in deployment names.
	subscriptions: [
	  'ozone'
	  'valor'
	]
  }
]

module serviceBusTopicsModule './serviceBusTopic.bicep' = [for item in topicsAndSubscriptions : {
  name: 'serviceBusTopic-${item.sanitizedName}-${deploymentNameSuffix}'
	params: {
	serviceBusName: serviceBusModule.outputs.serviceBusOutput.name
	topicName: item.topicName 
  }
}]

module topicsSubscriptionModule 'serviceBusTopicSubscription.bicep' = [ for item in topicsAndSubscriptions: {
  name: 'topicSubscription-${item.sanitizedName}-${deploymentNameSuffix}'
  params: {
	serviceBusName: serviceBusModule.outputs.serviceBusOutput.name
	topicName: item.topicName
	subscriptions: item.subscriptions
  }
  dependsOn: serviceBusTopicsModule
}]

// Create service bus queues
param queueSettings array = [
	{	
		name: 'ozone-property-changed-sbq'
		requiresDuplicateDetection: true
	}
	{
		name: 'valor-property-changed-sbq'
		requiresDuplicateDetection: false
	}
]

module serviceBusQueueModule './serviceBusQueue.bicep' = {
  name: 'serviceBusQueue-${deploymentNameSuffix}'
  params: {
	serviceBusName: serviceBusModule.outputs.serviceBusOutput.name
	queueSettings: queueSettings
  }
}

module serviceBusTopicSubsciptionForwardModule './serviceBusTopicSubscriptionForward.bicep' = {
  name: 'serviceBusTopicSubsciptionForward-${deploymentNameSuffix}'
  params: {
	serviceBusName: serviceBusModule.outputs.serviceBusOutput.name
	topicName: 'property~changed~v1'
	subscriptionName: 'valor'
	queueName: 'valor-property-changed-sbq'
  }
  dependsOn: [serviceBusQueueModule, topicsSubscriptionModule]
}

Azure DevOps Advanced Security not detecting vulnerabilities – 0 components found

Today at a client I noticed that when I built a solution in Visual Studio, I would get Warnings about security vulnerabilities in third party NuGet packages:

A screenshot from Visual Studio showing NuGet vulnerabilites as Warnings in the Error List.

We had previously setup Azure DevOp’s “Advanced Security” in our Build pipelines a while ago, so we should have already been alerted to this vulnerability, by the AdvancedSecurity-Dependency-Scanning@1 task. When I looked at the task’s output, it was rather empty:

0 components found

This is because the AdvancedSecurity-Dependency-Scanning@1 task needs to have the packages already downloaded – by either doing a dotnet restore first, or a dotnet build.

The code scanning pipeline looked like this:

steps:
- task: NuGetAuthenticate@1 # needed to authenticate for our private NuGet feed
- task: AdvancedSecurity-Codeql-Init@1
  inputs:
    languages: "csharp"
- task: AdvancedSecurity-Dependency-Scanning@1
- task: AdvancedSecurity-Codeql-Autobuild@1
- task: AdvancedSecurity-Codeql-Analyze@1
- task: AdvancedSecurity-Publish@1


You’ll notice that I already have an “Autobuild” task there. The fix then was to move the AdvancedSecurity-Dependency-Scanning@1 to after the AdvancedSecurity-Codeql-Autobuild@1 task:

steps:
- task: NuGetAuthenticate@1 # needed to authenticate for Tcc.Common@Local NuGet feed
- task: AdvancedSecurity-Codeql-Init@1 # Initializes the CodeQL database in preparation for building.
  inputs:
    languages: "csharp"
- task: AdvancedSecurity-Codeql-Autobuild@1 # Build project for CodeQL analysis 
- task: AdvancedSecurity-Codeql-Analyze@1 # Analyzes the code to find security vulnerabilities and coding errors.
- task: AdvancedSecurity-Dependency-Scanning@1 # scans NuGets for vulnerabilities - this needs to be after the autobuild task.
- task: AdvancedSecurity-Publish@1 # Publishes the results of the analysis to the Azure DevOps pipeline.


Once that was done the task detected 237 NuGet components:

237 components found on NuGet

I could now see a vulnerability reported as a Build warning:

build warning

and the specific vulnerability on the Repo’s Advanced Security page:

advanced security warning of Microsoft CVE advisory

Bicep – How to include a forward slash / in an Azure Service Bus Topic name

An architect at my current client insisted that we rename our Azure Service Bus topic from property-changed to property/changed/v1, to align with some naming convention.

Unfortunately, Bicep doesn’t like forward slashes / in names. And neither does the Azure portal. If you create a new topic named say matt/test in the Azure Portal, Azure will give it the name matt~test.

So, that’s how you do it in Bicep too – replace / with ~, like so:

resource serviceBus 'Microsoft.ServiceBus/namespaces@2021-11-01' existing = {
  name: serviceBusName
}

resource topic 'Microsoft.ServiceBus/namespaces/topics@2022-10-01-preview' = {
  parent: serviceBus
  name: property~changed~v1
  properties: {
  }
}

Unfortunately, this looks odd in the Azure portal, but we can see that it does have the correct URL with slashes:
Azure portal showing a topic

And ServiceBusExplorer.exe helpfully renders it as a folder structure:
service bus explorer

Blazor WASM configuration in an Azure Static Web app

I had a simple enough requirement, to display the name of the current environment in the title of a Blazor WASM web app.

The Blazor code was simple enough:

appsettings.json:
{
  "Environment": "local"
}
Home.razor:
@page "/"
@inject IConfiguration configuration

@{
    var title = $"My cool app ({configuration["Environment"]})";
}
<PageTitle>@title</PageTitle>

<h1>@title</h1>


This displays “My cool app (local)” when debugging locally. I want to change it to “My cool app (dev)”, “My cool app (test)”, and “My cool app (prod)” in each environment it gets deployed to.

A couple of things I tried and failed:

    1. Set a value for “Environment” using the “Environment variables” blade of the Static Web App in the Azure portal – hoping that this would override what’s in the appsettings.json. This doesn’t work, as values set here are only accessible for a managed Azure Function hosted on the static web app and not for front end code running in the browser.
    2. I tried setting an Environment variable in the AzureStaticWebApp@0 task like
      inputs:
        app_location: 'src'
        api_location: 'api'
        output_location: 'public'
        azure_static_web_apps_api_token: $(deployment_token)
      env: # Add environment variables here
        Environment: 'poop'
      

      But that didn’t work.

Eventually I noticed that the Blazor WASM app loads appsettings.json – you can see it in the Browser network tools.
So in my build pipeline I can use the good ol’ Replace Tokens task to replace tokens in my appsettings.json.
Man, that’s a blast from the past, I first used this task about ten years ago!

appsettings.Development.json:
{
  "Environment": "local"
}

appsettings.json:
{
  "Environment": "#{Environment}#"
}

build.yml:
    - task: qetza.replacetokens.replacetokens-task.replacetokens@6
      inputs:
        sources: '**/appsettings.json'

My build pipeline already has a variable called “Environment” so I didn’t have to add that.

I used the same name, i.e. “Environment” in my appsettings.json token and it just worked:

Operation references schema that does not exist.

I was getting the above error while trying to deploy Bicep templates for an Azure API Management API.

Specifically, I was trying to use the validate-content policy to validate the JSON schema of the request body.

I had this to define my API’s operation (i.e. endpoint):

resource CreateRatingUnitOperation 'Microsoft.ApiManagement/service/apis/operations@2023-03-01-preview' = {
  parent: Api
  name: 'createratingunit'
  properties: {
    displayName: 'Create Rating Unit'
    method: 'POST'
    urlTemplate: '/rating-unit'
    description: 'Create a rating unit changed notification'
    request: {
      representations: [
        {
           contentType: 'application/json' 
           schemaId: 'property-definition' // this is needed for the validate-content policy to work
        }
      ]
    }
    responses: [
      {
        description: 'success'
        statusCode: 201
      }
    ]
  }
}

But actually, the schemaId is not needed to be defined here. Removing the schemaId (but leaving contentType: ‘application/json’) fixes the problem.

Bicep warning – BCP081: Resource type does not have types available

If you see the above BCP081 warning, it means you’re trying to use something like this, which is copied and pasted from Microsoft’s own reference page:


resource symbolicname 'Microsoft.ApiManagement/service/apis/schemas@2023-05-01-preview' = {

BCP081 means that the type Microsoft.ApiManagement/service/apis/schemas is not in the 2023-05-01-preview API version.

This Stack Overflow answer explains one way to find which API version the type is in, by searching Azure’s ARM GitHub repo.

So in my case, I went over to that repo, and then typed a / to search through the whole repo. I searched for Microsoft.ApiManagement/service/apis/schemas which returned these 5 results:

Github search results

Which tells me that Microsoft.ApiManagement/service/apis/schemas is in 5 API versions:

  • 2021-08-01
  • 2022-08-01
  • 2021-04-01-preview
  • 2021-12-01-preview
  • 2022-04-01-preview.

So I should change my bicep to use one of those versions to make the Warning go away:


resource symbolicname 'Microsoft.ApiManagement/service/apis/schemas@2022-08-01' = {

It seems to me that there’s a bug in Microsoft’s documentation generator in that it suggested I use 2023-05-01-preview, since using that version generates a warning.

As a side note, no matter which version of Microsoft.ApiManagement/service/apis/schemas I used, I couldn’t get it to deploy the Definition to APIM. The deployment would run without errors, but the Definition never appeared in the APIM portal. So I ended up using Microsoft.ApiManagement/service/schemas@2022-08-01 instead:


resource propertySchema 'Microsoft.ApiManagement/service/schemas@2022-08-01' = {
  name: 'property-definition'
  parent: apimService
  properties: {
    description: 'Used to validate /property request'
    document: loadJsonContent('apim/create-property-schema.json')
    schemaType: 'json'
    value: any(null)
  }
}

which deploys the schema to a different location, but is an acceptable workaround for my needs – the validate-content APIM policy.

Deploy .NET 8 Blazor app to Azure Static Web App

At work I was asked to create and deploy a new .NET 8 Blazor app to an Azure Static Web App.

I’m brand new to Blazor, and brand new to Azure Static Web Apps, so I had a few stumbling blocks.

One of them was that I was getting this error when deploying via Azure Pipelines (using the AzureStaticWebApp@0 task):

Failed to find a default file in the app artifacts folder. Valid default files: index.html,Index.html.

The root cause of this was that when I created my Blazor app, I did so in Visual Studio 2022 using the “Blazor Web App” project template:

Visual Studio new Project dialog box, showing Blazor Web App

I should have instead used the “Blazor WebAssembly Standalone App” project template:

Visual Studio new Project dialog box, showing Blazor WebAssembly Standalone App

This was an easy newbie mistake to make, because:

  1. The Blazor Web App template is suggested immediately, I didn’t need to search for it. I didn’t know the WebAssembly Standalone App template exists, until I searched for “Blazor” in the New project search box.
  2. The Blazor Web App template includes options to choose the Interactive Render Mode, and WebAssembly is one of them, so I thought I was choosing doing the correct option for an Azure Static Web app.

More instructions are on Thomas Gauvin’s blog post.

Here’s some more thoughts I have on Static Web Apps so far, particularly the AzureStaticWebApp@0 Pipeline task.

  1. I don’t like the deployment model, i.e. how it deploys from your source repo directly. I prefer a traditional Build Artifact approach, because a Build Artifact is a set in stone and can be deployed to another environment. Deploying from source feels wishy-washy.
  2. I also don’t like how the it needs a unique deployment token to deploy to it, via the azure_static_web_apps_api_token parameter. Why can’t it use the same parameters as other tasks, i.e. AzureFunctionApp@2, which takes azureSubscription and appName parameters.

Decompile ASP.NET source from deployed dlls

We had an interesting scenario at a client’s a couple of months ago. A staff member had deleted the source code repository for an ASP.NET Web API from Azure DevOps – their justification was that the repository had the name “to be deleted”, so they went ahead and deleted it.

Months later, they realised that actually, the application is still in use in production, and we need the source code back. It could not be restored from Azure DevOps, as it had been deleted too long ago.

An old timer (Mark) had recently left the company and so handed in his laptop, which, fortunately, hadn’t been reformatted, and still had a copy of the source code of the deleted repository on it. So they took the code from his laptop and added it back to Azure DevOps.

But it was always thought that the code recovered from Mark’s laptop wasn’t the latest version of the code, and that what was deployed to production was newer than the recovered code. Therefore the recovered code is read-only and only for reference, and we couldn’t deploy any changes to the API.

About a year goes by, and we need an enhancement done to the production API, which I’m asked to have a look at.

So, I first needed to determine if the source code really was older than what was really deployed. We came up with a plan:

  • deploy the recovered source code for the API to our test server
  • download the compiled dlls from the test Azure app service
  • download the compiled dlls from the production Azure app service
  • decompile the compiled dlls from both to reverse-engineer the source code
  • compare the decompiled source code from both to determine what code changes there are

It could have been quite a laborious process, because the application in question had lots of projects (.csproj files) and thus lots of dlls (28) to compare. But I found a couple of tools which helped greatly.

  • ILSpy (free)
  • Beyond Compare (free trial)

Download the dlls from Azure

You can do this from the Azure Portal using the Kudu console, aka “Advanced tools”, and then the CMD Debug Console:

Decompile source code from the Azure app service website

ILSpy is a great tool for this, and it’s free.

  1. Open ILSpy, and clear out the Assemblies window (Ctrl-A, delete)
  2. Unzip the wwwroot folder you downloaded above
  3. Select the .dlls containing your source code
  4. Drag them into ILSpy’s Assemblies window
  5. Select all of the Assemblies in ILSpy (Ctrl-A)
  6. File -> Save Code. ILSpy will generate a Visual Studio .sln file containing all the code for you – too easy!

I did this for our test server (from the recovered source code), and then again for the code in production.

Compare content of two folders

Once I had my decompiled source from test and production, I needed to compare the 2 to check for differences.

I couldn’t find a decent free tool to easily compare the content of 2 folders. I ended up using Beyond Compare, which I first saw over ten years ago. It has a free trial. I tweaked its options to ignore timestamps.

Leave a comment if you know of a decent freeware tool for comparing folders.

Results

I did find a couple of minor changes between the decompiled code in test and production. I also needed to check other non-code files such as web.config for differences. In the end it looked to me that what was on our test server was actually a  newer version than what was in production. I figured that Mark probably had develop branch with some minor fixes (which never made it to prod) checked out on his laptop when it was recovered, and so what was deployed to prod was older.

I was able to add the requested minor enhancement, but also the team was stoked to know that they now have the source code for their API back. Although, it’s a legacy API which is on the roadmap to be replaced in the next few months anyway…

Conditionally specify a property in an ARM template

At my current contract I’ve been doing a lot more DevOps than I have in the past, mainly because they don’t have enough specialist DevOps engineers. So us developers are encouraged to look after our own Build and Release pipelines and Azure resources. Which means over the past 18 months I’ve spent probably about a month writing ARM (Azure Resource Manager) templates.

Recently I was stuck trying to conditionally specify a property. ARM templates allow you to conditionally specify a resource, via the condition property. But I couldn’t find an easy way to conditionally specify a property. I eventually figured out a way to do it which I couldn’t find documented anywhere.

In my case, I was deploying an API Management ARM template which is shared across our organization, and I wanted to be able to optionally set the OAuth 2.0 server for an API, if the server name is passed in as a parameter. The block in the ARM template looks like this:

{
    "parameters": {
        "oAuthServerId": {
            "type": "string",
            "defaultValue": "",
            "metadata": {
                "description": "The ID of the OAuth 2.0 server."
            }
        }
    },
    "resources": [
        {
            "type": "Microsoft.ApiManagement/service/apis",
            "name": "[variables('apiName')]",
            "apiVersion": "2018-06-01-preview",
            "properties": {
                "authenticationSettings": {
                    "oAuth2": {
                        "authorizationServerId": "[parameters('oAuthServerId')]"
                    }
                }
            }
        }
    ]
}

Because this template is already shared across our organization, and most of the organization’s APIs are not using OAuth (yet), I added a new optional oAuthServerId parameter.
My initial naive implementation was just like the above. My hope was that for all the other APIs that aren’t using OAuth, the empty default value of the parameter would be used (“”), resulting in the following output:

"properties": {
    "authenticationSettings": {
        "oAuth2": {
            "authorizationServerId": ""
        }
    }
}

My hope was that if the authorizationServerId is blank, then Azure would default the User Authorization to “None” (so that I don’t break existing deployments which already use this ARM template):

However, that didn’t work: Authorization server was not found.

I won’t bore you with all the things I tried in the hours that followed as I tried to get this to work. Eventually I found a solution, which is to create a variable for the entire authenticationSettings object and conditionally specify that parent object, rather than trying to conditionally specify the child authentication.oAuth2.authorizationServerId.

{
    "parameters": {
        "oAuthServerId": {
            "type": "string",
            "defaultValue": "",
            "metadata": {
                "description": "The ID of the OAuth 2.0 server."
            }
        }
    },
    "variables": {
        "authenticationSettings": {
            "oAuth2": {
                "authorizationServerId": "[parameters('oAuthServerId')]"
            }
        }
    },
    "resources": [
        {
            "type": "Microsoft.ApiManagement/service/apis",
            "name": "[variables('apiName')]",
            "apiVersion": "2018-06-01-preview",
            "properties": {
                "authenticationSettings": "[if(equals(parameters('oAuthServerId'),''), json('null'), variables('authenticationSettings'))]"
            }
        }
    ]
}

A couple of other tips I’ve found useful for ARM template writing.

  • Always test the ARM templates from Powershell on your local machine, rather than commiting and pushing the changes to Azure DevOps and waiting for DevOps to run your pipeline and eventually fail. As with all development, you’ll be much more efficient if you can shorten your feedback loop.
    1. Install the latest Powershell
    2. Install the latest Azure Powershell
    3. Connect to Azure at the Powershell command line with Connect-AzAccount
    4. Connect to your “Development” subscription with something like Set-AzContext -SubscriptionId f2b1b88a-xxxx-xxxx-a9e1-99a96d8b95f4
    5. Create a parameters file for testing your ARM template locally
    6. Validate your ARM template with Test-AzResourceGroupDeployment
    7. Run your ARM template with New-AzResourceGroupDeployment
  • If you can’t find the name or the property of a resource, check out the (still in Preview after many years) site https://resources.azure.com/