Customize Blazor WASM sidebar per environment

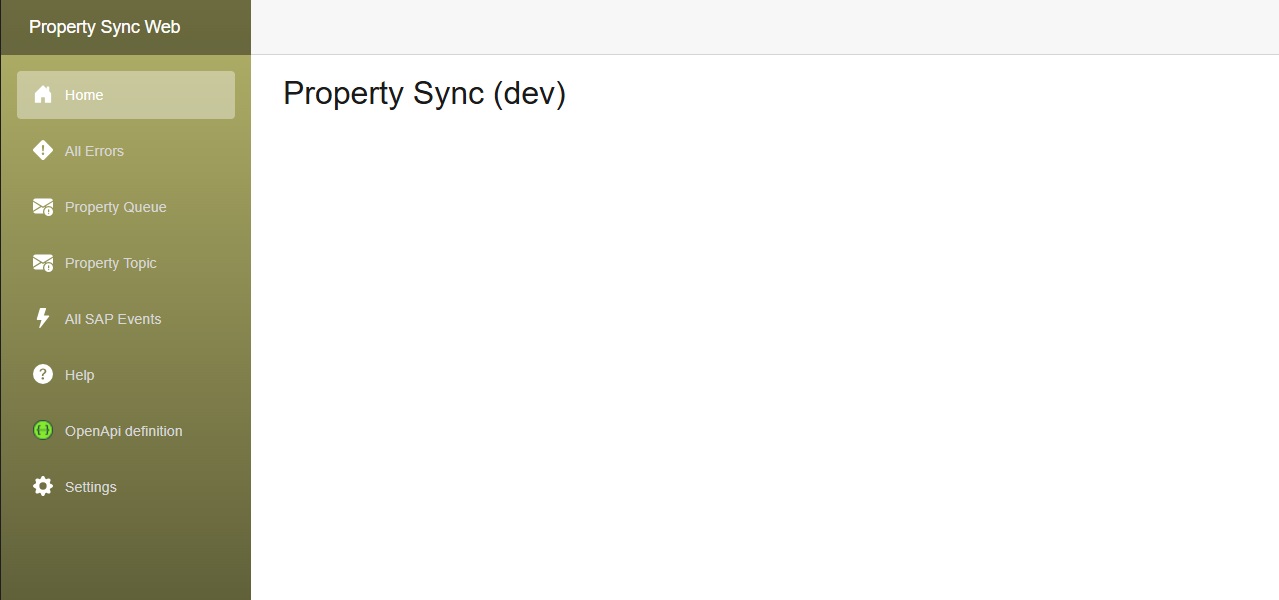
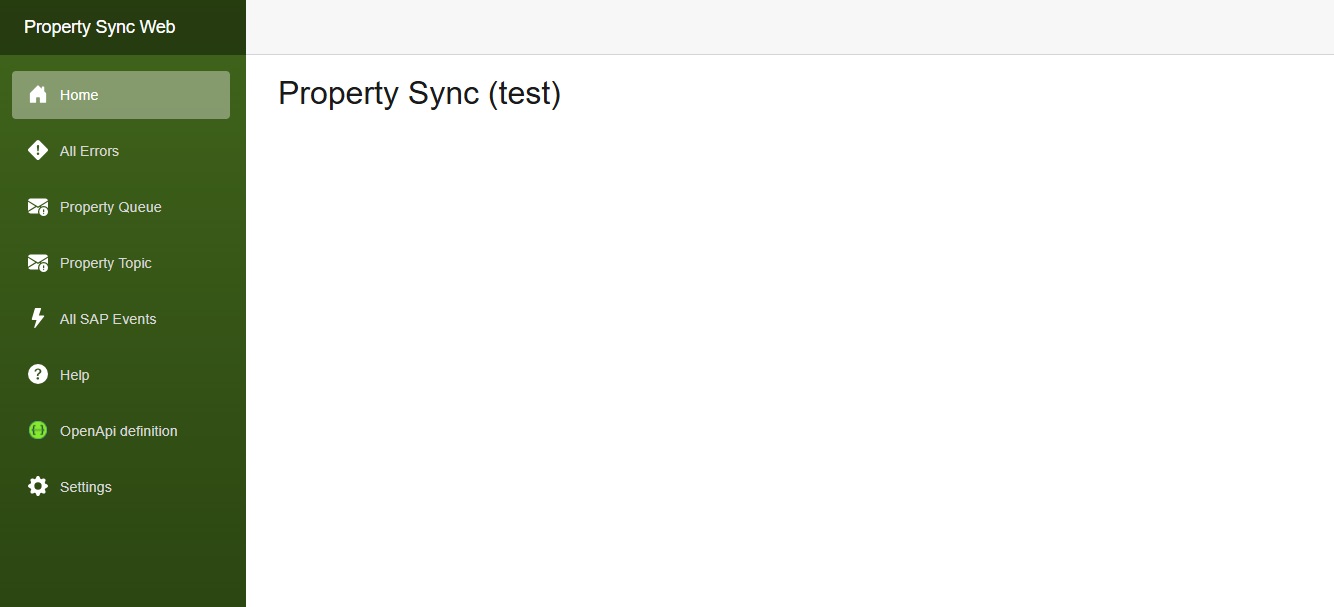
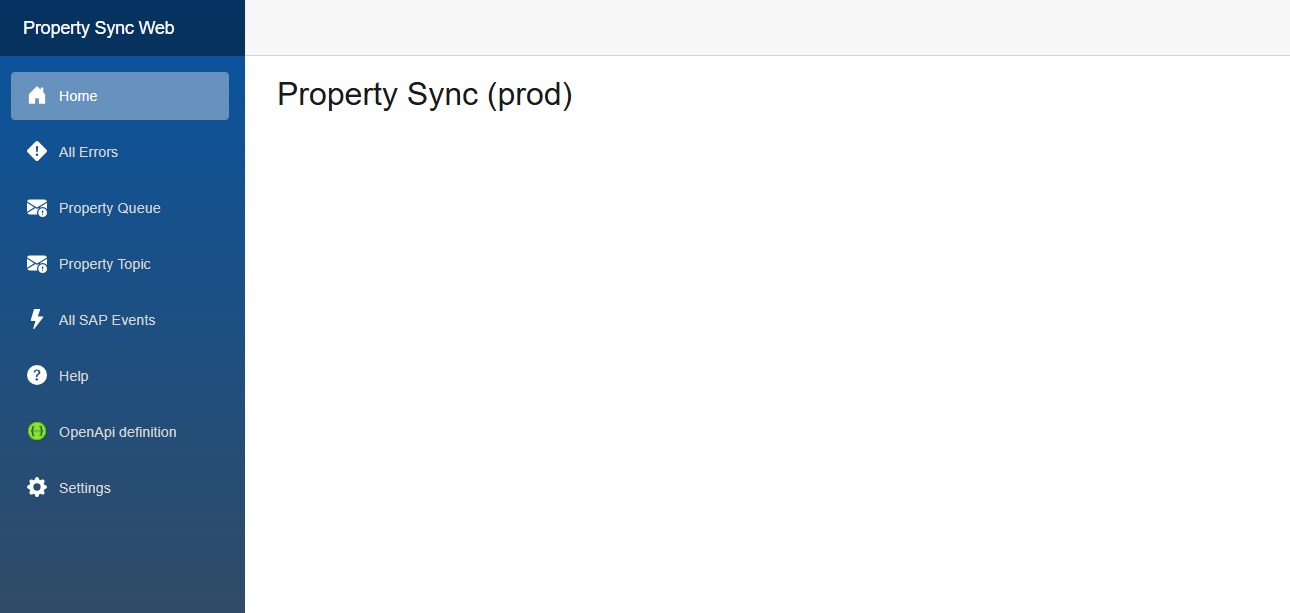
Our client wanted to have a slightly different color scheme for our internal application for each environment, i.e. dev, test and production.

I implemented this by injecting an IConfiguration which I wrote about in 2024.

The component we need to change is in MainLayout.razor, the div with class=”sidebar”.
I’m not sure how to change the css via code, or if it’s possible, so I used an inline style to the div.

MainLayout.razor:

@inherits LayoutComponentBase
@inject IConfiguration Configuration
<div class="page">
    <div class="sidebar" style="background-image: linear-gradient(180deg, @SidebarTopColor 0%, @SidebarBottomColor 70%);">
        <NavMenu />
    </div>
<FluentDialogProvider />
<FluentTooltipProvider />
<FluentMessageBarProvider />

@code {
    private string SidebarTopColor = "#052767"; // dark sapphire blue - these are the Blazor default colors
    private string SidebarBottomColor = "#3a0647"; // dark purple
    protected override void OnInitialized()
    {
        var environment = Configuration["Environment"]?.ToLowerInvariant() ?? "local";
        switch (environment)
        {
            case "dev":
                SidebarTopColor = "#b4b369"; // yellowy greeny
                SidebarBottomColor = "#545432"; // dark olive green
                break;
            case "test":
                SidebarTopColor = "#40651b"; // greenish
                SidebarBottomColor = "#294211"; // dark green
                break;
            case "prod":
                SidebarTopColor = "#0854A0"; // victoria blue
                SidebarBottomColor = "#354a5f"; // dark blue grey
                break;
        }
    }
}

A nicer free Blazor WASM Data grid, toast, and confirm

A Blazor WASM .NET 8 proof-of-concept project I recently worked needed a data grid.

  • MudBlazor, at the time, it didn’t support .NET 8 WASM. (It might now, I’m not sure).
  • Blazorise – looks good, but I didn’t want the client to pay, because it’s a POC.
  • QuickGrid – used this for the initial version. Easy to use, but needs CSS skills to customize.
  • FluentDataGrid – much prettier, and easier to use than the QuickGrid. Almost a drop-in replacement for the QuickGrid.

QuickGrid

I initially started out with QuickGrid. After tweaking the CSS to get the column widths right, the result was this:

I would have liked the text to overflow … and show the full text on hover. I played around with the CSS and it kinda worked, but it wasn’t great.

FluentDataGrid

Later I found the FluentDataGrid, which is part of FluentUI Blazor. It already has the overflow with tooltip:

Dialog

You would think that Blazor would have a built-in easy way to popup a confirm message to the user, but it doesn’t come with any. The only way I could find was to use an old-fashioned javascript confirm:


bool confirmed = await JsRuntime.InvokeAsync<bool>("confirm", $"Are you sure you want to resend {loggedEvent.MessageBody}?");
if (confirmed)
{

// do stuff

Which is pretty basic.

FluentUI Blazor’s dialog is a bit prettier:


var dialog = await _dialogService.ShowConfirmationAsync($"Are you sure you want to resend {loggedEvent.EventType} for {loggedEvent.Id}?");
var result = await dialog.Result;

if (!result.Cancelled)
{

// do stuff

Notifications

FluentUI Blazor also has a ToastService for easily showing a pop-up (like how toast pops-up when it’s ready) to notify users.


_toastService.ShowSuccess($"{loggedEvent.Id} was resent.");


Blazor WASM configuration in an Azure Static Web app

I had a simple enough requirement, to display the name of the current environment in the title of a Blazor WASM web app.

The Blazor code was simple enough:

appsettings.json:
{
  "Environment": "local"
}
Home.razor:
@page "/"
@inject IConfiguration configuration

@{
    var title = $"My cool app ({configuration["Environment"]})";
}
<PageTitle>@title</PageTitle>

<h1>@title</h1>


This displays “My cool app (local)” when debugging locally. I want to change it to “My cool app (dev)”, “My cool app (test)”, and “My cool app (prod)” in each environment it gets deployed to.

A couple of things I tried and failed:

    1. Set a value for “Environment” using the “Environment variables” blade of the Static Web App in the Azure portal – hoping that this would override what’s in the appsettings.json. This doesn’t work, as values set here are only accessible for a managed Azure Function hosted on the static web app and not for front end code running in the browser.
    2. I tried setting an Environment variable in the AzureStaticWebApp@0 task like
      inputs:
        app_location: 'src'
        api_location: 'api'
        output_location: 'public'
        azure_static_web_apps_api_token: $(deployment_token)
      env: # Add environment variables here
        Environment: 'poop'
      

      But that didn’t work.

Eventually I noticed that the Blazor WASM app loads appsettings.json – you can see it in the Browser network tools.
So in my build pipeline I can use the good ol’ Replace Tokens task to replace tokens in my appsettings.json.
Man, that’s a blast from the past, I first used this task about ten years ago!

appsettings.Development.json:
{
  "Environment": "local"
}

appsettings.json:
{
  "Environment": "#{Environment}#"
}

build.yml:
    - task: qetza.replacetokens.replacetokens-task.replacetokens@6
      inputs:
        sources: '**/appsettings.json'

My build pipeline already has a variable called “Environment” so I didn’t have to add that.

I used the same name, i.e. “Environment” in my appsettings.json token and it just worked:

Add icons to Blazor’s NavMenu in .NET 8

The default Blazor navigation menu is in NavMenu.razor. Its CSS is in NavMenu.razor.css, and contains such exciting classes as bi-plus-square-fill-nav-menu and bi-house-door-fill-nav-menu.

These are all Bootstrap Icons. Here I’ll show you how to add another Bootstrap icon to the NavMenu.

I’m going to add the “Envelope exclamation fill” icon. From the Bootstrap page, copy the SVG code to your clipboard, e.g.

<svg xmlns="http://www.w3.org/2000/svg" width="16" height="16" fill="currentColor" class="bi bi-envelope-exclamation-fill" viewBox="0 0 16 16">
  <path d="M.05 3.555A2 2 0 0 1 2 2h12a2 2 0 0 1 1.95 1.555L8 8.414zM0 4.697v7.104l5.803-3.558zM6.761 8.83l-6.57 4.026A2 2 0 0 0 2 14h6.256A4.5 4.5 0 0 1 8 12.5a4.49 4.49 0 0 1 1.606-3.446l-.367-.225L8 9.586zM16 4.697v4.974A4.5 4.5 0 0 0 12.5 8a4.5 4.5 0 0 0-1.965.45l-.338-.207z"/>
  <path d="M12.5 16a3.5 3.5 0 1 0 0-7 3.5 3.5 0 0 0 0 7m.5-5v1.5a.5.5 0 0 1-1 0V11a.5.5 0 0 1 1 0m0 3a.5.5 0 1 1-1 0 .5.5 0 0 1 1 0"/>
</svg>

We’re gonna need to URL encode the above. Paste the above into Notepad, and then Ctrl-H to replace:

currentColor with white
" with '
< with %3C
> with %3E
and remove all new lines
which should give you
%3Csvg xmlns='http://www.w3.org/2000/svg' width='16' height='16' fill='white' class='bi bi-envelope-exclamation-fill' viewBox='0 0 16 16'%3E%3Cpath d='M.05 3.555A2 2 0 0 1 2 2h12a2 2 0 0 1 1.95 1.555L8 8.414zM0 4.697v7.104l5.803-3.558zM6.761 8.83l-6.57 4.026A2 2 0 0 0 2 14h6.256A4.5 4.5 0 0 1 8 12.5a4.49 4.49 0 0 1 1.606-3.446l-.367-.225L8 9.586zM16 4.697v4.974A4.5 4.5 0 0 0 12.5 8a4.5 4.5 0 0 0-1.965.45l-.338-.207z'/%3E%3Cpath d='M12.5 16a3.5 3.5 0 1 0 0-7 3.5 3.5 0 0 0 0 7m.5-5v1.5a.5.5 0 0 1-1 0V11a.5.5 0 0 1 1 0m0 3a.5.5 0 1 1-1 0 .5.5 0 0 1 1 0'/%3E%3C/svg%3E

Now open the NavMenu.razor.css and copy one of the existing styles such as .bi-list-nested-nav-menu and give it a new name, such as .bi-envelope-fill-nav-menu. Paste in the above after “data:image/svg+xml,”.

.bi-envelope-fill-nav-menu {
    background-image: url("data:image/svg+xml,%3Csvg xmlns='http://www.w3.org/2000/svg' width='16' height='16' fill='white' class='bi bi-envelope-exclamation-fill' viewBox='0 0 16 16'%3E%3Cpath d='M.05 3.555A2 2 0 0 1 2 2h12a2 2 0 0 1 1.95 1.555L8 8.414zM0 4.697v7.104l5.803-3.558zM6.761 8.83l-6.57 4.026A2 2 0 0 0 2 14h6.256A4.5 4.5 0 0 1 8 12.5a4.49 4.49 0 0 1 1.606-3.446l-.367-.225L8 9.586zM16 4.697v4.974A4.5 4.5 0 0 0 12.5 8a4.5 4.5 0 0 0-1.965.45l-.338-.207z'/%3E%3Cpath d='M12.5 16a3.5 3.5 0 1 0 0-7 3.5 3.5 0 0 0 0 7m.5-5v1.5a.5.5 0 0 1-1 0V11a.5.5 0 0 1 1 0m0 3a.5.5 0 1 1-1 0 .5.5 0 0 1 1 0'/%3E%3C/svg%3E");
}

Now you can use the bi-envelope-fill-nav-menu class in the NavMenu.razor:

<div class="nav-item px-3">
    <NavLink class="nav-link" href="rating-unit-dead-letter">
        <span class="bi bi-envelope-fill-nav-menu" aria-hidden="true"></span> Rating Unit Dead Letter
    </NavLink>
</div>

And here it is:

Deploy .NET 8 Blazor app to Azure Static Web App

At work I was asked to create and deploy a new .NET 8 Blazor app to an Azure Static Web App.

I’m brand new to Blazor, and brand new to Azure Static Web Apps, so I had a few stumbling blocks.

One of them was that I was getting this error when deploying via Azure Pipelines (using the AzureStaticWebApp@0 task):

Failed to find a default file in the app artifacts folder. Valid default files: index.html,Index.html.

The root cause of this was that when I created my Blazor app, I did so in Visual Studio 2022 using the “Blazor Web App” project template:

Visual Studio new Project dialog box, showing Blazor Web App

I should have instead used the “Blazor WebAssembly Standalone App” project template:

Visual Studio new Project dialog box, showing Blazor WebAssembly Standalone App

This was an easy newbie mistake to make, because:

  1. The Blazor Web App template is suggested immediately, I didn’t need to search for it. I didn’t know the WebAssembly Standalone App template exists, until I searched for “Blazor” in the New project search box.
  2. The Blazor Web App template includes options to choose the Interactive Render Mode, and WebAssembly is one of them, so I thought I was choosing doing the correct option for an Azure Static Web app.

More instructions are on Thomas Gauvin’s blog post.

Here’s some more thoughts I have on Static Web Apps so far, particularly the AzureStaticWebApp@0 Pipeline task.

  1. I don’t like the deployment model, i.e. how it deploys from your source repo directly. I prefer a traditional Build Artifact approach, because a Build Artifact is a set in stone and can be deployed to another environment. Deploying from source feels wishy-washy.
  2. I also don’t like how the it needs a unique deployment token to deploy to it, via the azure_static_web_apps_api_token parameter. Why can’t it use the same parameters as other tasks, i.e. AzureFunctionApp@2, which takes azureSubscription and appName parameters.